
Breadboard Power Supply Kit 5V/3.3V
Description
- Provides clean 5V/3.3V to your breadboard or project
- Requires soldering and assembly
- No assembly manual provided
The Breadboard Power Supply Kit is a very simple breadboard power supply kit that takes power from a DC wall wart and outputs a selectable 5V or 3.3V regulated voltage. The .1" headers are mounted on the bottom of the PCB for simple insertion into a breadboard. Pins labeled VCC and GND plug directly into the power lines. The lone pair of pins have no electrical connection but help support the PCB. There are two pins available within the barrel jack footprint. Any stripped +/- DC supply can be connected instead of the barrel connector. Board has both an On/Off switch and a voltage select switch (3.3V/5V).
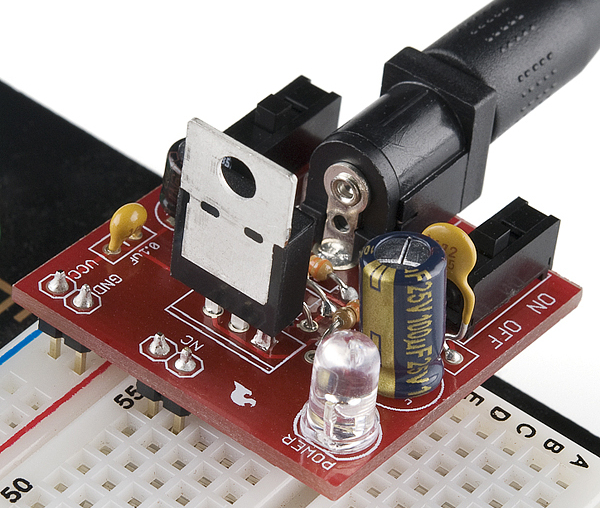
This product comes as a bag of parts kit and is easily assembled if you can follow the silkscreen indicators and have beginning experience with a soldering iron. You will need to read the resistor bands or use a multimeter to determine the resistor sizes. No assembly manual is provided.
- DC Barrel Connector (2.1mm center positive)
- TO-220 Voltage Regulator (LM317 1.5A max current)
- 1N4004 Reverse Protection Diode
- 100uF 25V Capacitor
- 10uF 25V Capacitor
- 0.1uF 50V Capacitor
- Red Power LED - High Brightness
- 2pcs SPDT Slide Switch
- 4pcs 0.1" Header Pins
- 2pcs 330Ω Resistor 1/6W
- 390Ω Resistor 1/6W
- 240Ω Resistor 1/6W
- Bare PCB with Silkscreen Indicators
- Recommended power supply: Wall Adapter Power Supply - 9VDC 650mA
Fits the breadboard and really easy to assembly even for beginners in electronics (as I am). Reliable so far.
This circuit is easy to build, but since it does not come with a build sheet; besides soldering experience you should have access to resistor color code information (for correct placement of resistors). The only other component that is tricky to place is the Power LED which must be installed in the correct orientation (not marked like electrolytic caps; lead length is the clue). You best test the LED to determine the + pin orientation before soldering in place. I also found the output voltages to be 3.21 (for 3.3 setting) and 4.88v (for 5V setting). The last comment is that the breadboard pins are in line on the circuit board, but when you plug into the solderless breadboard the power bus lines are offset slightly which means the power supply board does not sit square on the breadboard (not a big issue just an observation). It would have been nice if the circuit board offset the breadboard output pins to match the breadboard.
This circuit is easy to build, but since it does not come with a build sheet. besides soldering experience you should have access to resistor color code information (for correct placement of resistors). The only other component that is tricky to place is the Power LED which must be installed in the correct orientation (not marked like electrolytic caps. lead length is the clue). You best test the LED to determine the + pin orientation before soldering in place. I also found the output voltages to be 3.21 (for 3.3 setting) and 4.88v (for 5V setting). The last comment is that the breadboard pins are in line on the circuit board, but when you plug into the solderless breadboard the power bus lines are offset slightly which means the power supply board does not sit square on the breadboard (not a big issue just an observation). It would have been nice if the circuit board offset the breadboard output pins to match the breadboard.
Ce circuit est facile à construire, mais comme il n’est pas accompagné d’une feuille de construction; en plus de l'expérience de la soudure, vous devez avoir accès aux informations du code de couleur des résistances (pour un placement correct des résistances). Le seul autre composant qui soit difficile à placer est le voyant d'alimentation qui doit être installé dans le bon sens (non marqué comme les capuchons électrolytiques; la longueur de fil est l'indice). Il est préférable de tester le voyant pour déterminer l’orientation de la broche + avant de souder en place. J'ai aussi trouvé que les tensions de sortie étaient 3.21 (pour le réglage 3.3) et 4.88v (pour le réglage 5V). Le dernier commentaire est que les broches de la planche à pain sont alignées sur le circuit imprimé, mais lorsque vous branchez la carte à pain sans soudure, les lignes du bus d’alimentation sont légèrement décalées, une remarque). Cela aurait été bien si le circuit imprimé compensait les broches de sortie de la planche à pain pour correspondre à la planche à pain.
Works great, fairly simple to assemble as long as you can solder.
Estimate shipping
Refund Policy
If you are not satisfied with a product purchased from the Site, you may request a return within 30 days from the delivery date, unless the product is listed under the Return Exceptions below or is subject to specific return conditions noted on the product page.
This return policy also applies, as a minimum standard, to products sold and fulfilled by third-party vendors through the Marketplace.
Please review the Return Conditions, Return Exceptions and the process on How to Request a Return Authorization (RA) before initiating a return request.
Returns under this policy concern non-defective products. In the case of a confirmed manufacturing defect, remedies are handled under the Warranty terms, at the Vendor's discretion. See the Warranty section.
Return Conditions
To qualify for a refund under the 30-day return policy, all of the following conditions must be met:
- A valid Return Authorization (RA) number must be obtained prior to returning the product. Returns without an RA number will be refused.
- The RA number is valid for 30 days. The returned item must be received within that period.
- The RA number must be included with the return.
- Products must be returned in unused, unmodified condition (e.g., no scratches, alterations, missing parts, or signs of installation/use) and in their original packaging, suitable for resale.
- Shipping fees are non-refundable. Return shipping costs are the responsibility of the customer, except in cases of a product confirmed defective through RobotShop's troubleshooting process or of a verified shipping error by RobotShop.
- Refunds are processed within 7 days after receipt and inspection of the returned item.
- A $100 cleaning fee may apply to domestic robots returned in used or unclean condition.
- A 20% restocking fee may apply to large-quantity returns of items ordered specifically for the customer from the manufacturer or not part of RobotShop's standard inventory.
Return Exceptions
The following products are not eligible for return or refund under this policy:
- Used, damaged, or modified products — Items that show signs of use, wear, or alteration, making them unsuitable for resale.
- Consumables — Use and wear-and-tear components, altered or depleted through use (e.g., batteries, belts, brushes, gears, filament, tires, disposable bags, lubricants, greases, waxes, etc.). Not eligible for return once opened or used.
- Perishables — Goods liable to deteriorate or expire rapidly. Not eligible for return.
- Sealed goods (health or hygiene) — Items sealed for health-protection or hygiene reasons (e.g., masks, gloves, odor-absorbing products). Not eligible for return once unsealed.
- Build-it-yourself products and items requiring customer assembly — Including robots & kits, robot parts, and other products requiring assembly or soldering. Not eligible for return once assembled, soldered, or installed.
- Digital Goods, Software, and Apps — Final sale only, due to licensing restrictions.
- Clearance Items — Products identified as clearance or final sale, including end-of-life or discontinued items.
- Custom-made, personalized, or special-order items — Products manufactured, configured, adapted, or built to the customer's own specifications and requirements.
- On-Demand Items — Standard catalogue products not stocked by RobotShop and ordered specifically to fulfill a customer request.
- Professional & Specialized Equipment — See the Professional & Specialized Equipment Warranty page and Professional & Institutional Buyers (B2B) section in the Terms & Conditions.
How to Request a Return Authorization (RA)
While the same return policy applies, these orders require a separate contact process for returns.
- RobotShop Fulfilled Orders → submit a support ticket from your account under My Support Tickets.
- Marketplace Vendor Orders → submit a ticket from your account under My Marketplace Tickets to contact the vendor directly.
Note: Marketplace vendor products are normally labelled with SKUs starting with RM, and identified on the product page with the mention "Sold and fulfilled by [Vendor Name]".
